This weekend, I did a makeover on my son's room while he was visiting his dad. After seeing some things on the internet about paint swatches, I decided to paint everything. Since he is the last of four children, I had a mish-mash of different pieces in his room. Nothing matched. White walls with a few crayon marks on them....where was I when he did that?? Toys all over. Before he left, my son and I did a "game" of Keep-or-Giveaway. We often go to thrift stores, so he understood the concept of giving other kids the opportunity to play with his old toys. I am very proud of him, he gave up two large boxes of odd ball toys.
It took two days to move, paint, and organize. And it was fun!
Race cars, Disney's Toy Story, Disney's Cars and Marvel Avengers. He likes a lot of stuff. Why not incorperate them all.
The bed is an IKEA twin that came off a trundle no longer being used. The frame is not quite complete in the painting department, but it was an easy bulld. 2x12s and a piece of sanded plywood resting on a 1x1 shelf, three inches from the top. *Note to self, watch out for little dogs while painting. Hard to see, but there are little dog prints on the carpet. This room is soon to be laminate.
The dresser turned out super.
In an odd corner, small shelves display my son's Cars collection. Clean up is a snap.
The reveal was great, he was so happy. Now, he wants me to play in his room all day.
Happy Painting.
One woman with many hats. Sewing, crafts, gardening and enjoying the spoils of this little farm.
Monday, May 7, 2012
On the Farm - Spring
Several thing have been happening around these parts. Spring is here. I've been planting up a storm, weeding, cleaning the pool and watching nature work her magic.
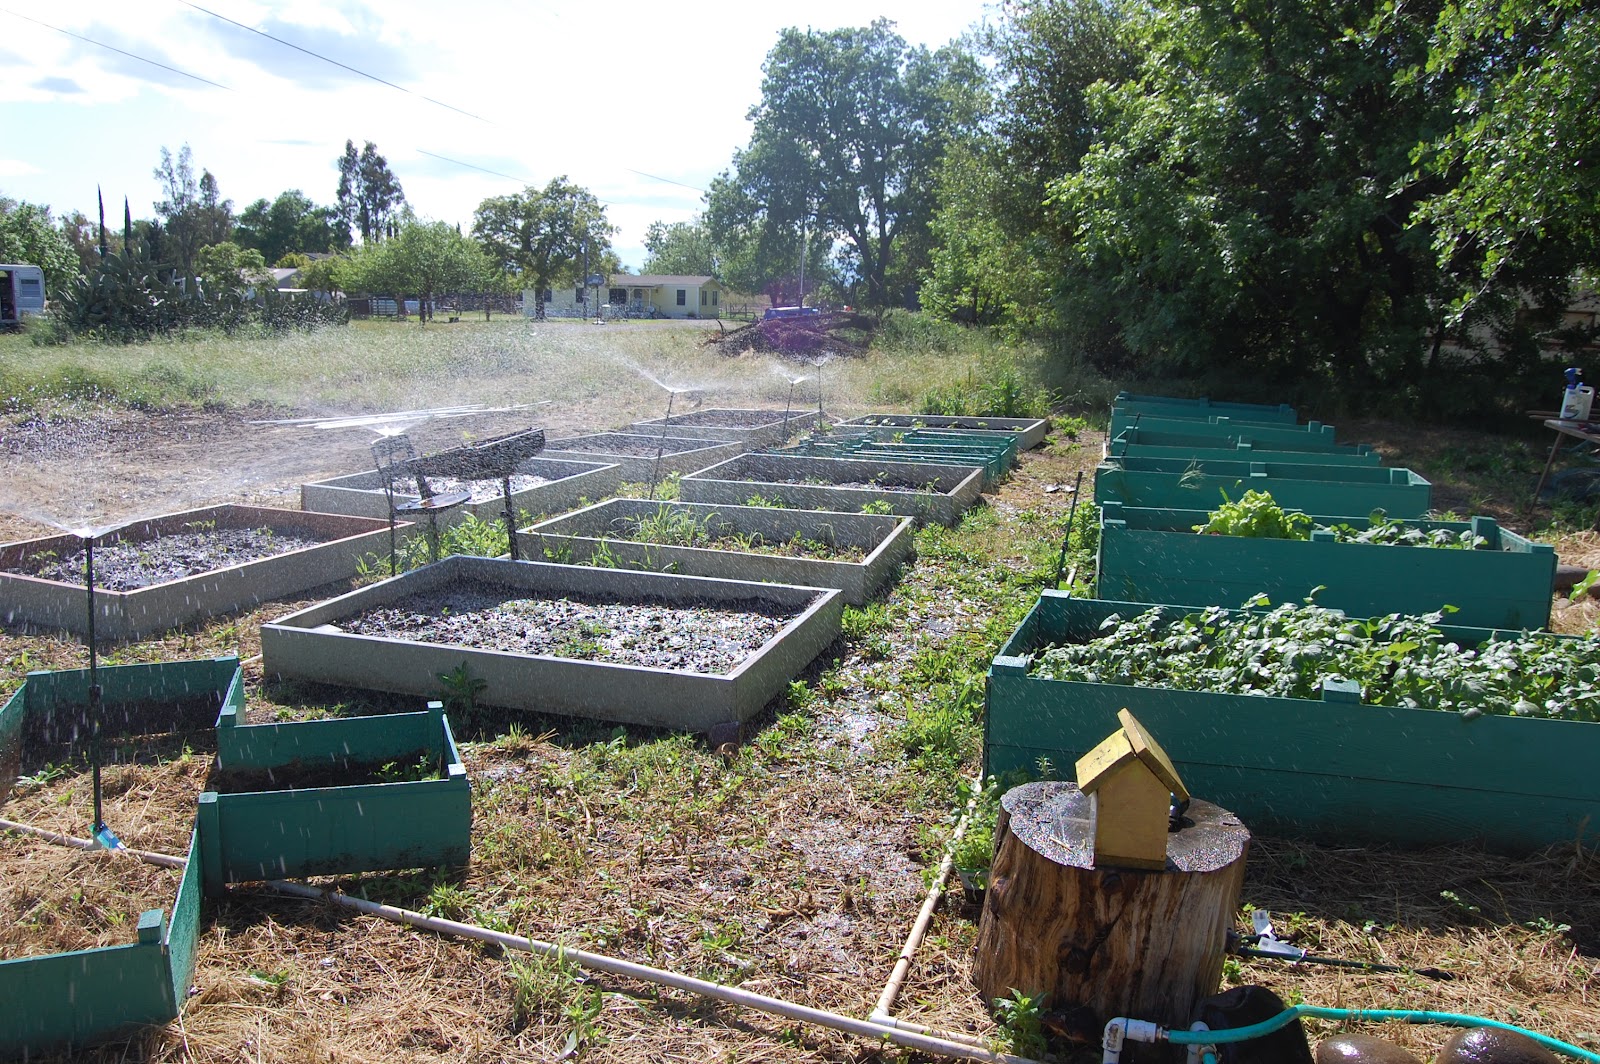
This is this summer's Raised Bed Garden. After trying several different styles of garden, this by far, is the best for my soil, my manpower and my patience. Simple construction of low boxes are 2x6 lumber that was cut at Home Depot for free and painted with OOPS paint (see H.D. paint section and you can stumble on great treasures of paint that wasn't perfect, for cheap). PVC sprinklers that are portable and easy to fix just in case. Soon, when the weeds get high, I run the weed eater between the boxes and lay down straw.
Newly hatched Bantum Blue Silkies, courtesy of "Mama Hen" (my daughter, Miranda)
Grapes, grapes, and more grapes. Three different varieties - Green Ladyfinger, Thompson Seedless and Red Globe Seedless. Planted along the borders of my property, drip irrigation and recycled 4x4s and wire supports. I hope that one day I can make raisins, juice and have several walks in the orchard with a fist full of grapes.
Our pool is a simple one, but a vital.Northern California hits triple digits often. Tiki torches allow us to enjoy the cool water without the pests. I have been researching lifeguard chairs to sit high and over the edge of the pool, so I can get my feet cool while watching the little ones play. I hope to include construction in an upcoming blog, made from PVC pipe. Can you tell I love that stuff!!
My son enjoying his favorite veggie, RADISHES. Good thing they grow so quickly. The radishes, not the kids. In a few days, my son will be six.
I love Spring! Happy Living Outside this month.
This is this summer's Raised Bed Garden. After trying several different styles of garden, this by far, is the best for my soil, my manpower and my patience. Simple construction of low boxes are 2x6 lumber that was cut at Home Depot for free and painted with OOPS paint (see H.D. paint section and you can stumble on great treasures of paint that wasn't perfect, for cheap). PVC sprinklers that are portable and easy to fix just in case. Soon, when the weeds get high, I run the weed eater between the boxes and lay down straw.
Newly hatched Bantum Blue Silkies, courtesy of "Mama Hen" (my daughter, Miranda)
Grapes, grapes, and more grapes. Three different varieties - Green Ladyfinger, Thompson Seedless and Red Globe Seedless. Planted along the borders of my property, drip irrigation and recycled 4x4s and wire supports. I hope that one day I can make raisins, juice and have several walks in the orchard with a fist full of grapes.
Our pool is a simple one, but a vital.Northern California hits triple digits often. Tiki torches allow us to enjoy the cool water without the pests. I have been researching lifeguard chairs to sit high and over the edge of the pool, so I can get my feet cool while watching the little ones play. I hope to include construction in an upcoming blog, made from PVC pipe. Can you tell I love that stuff!!
My son enjoying his favorite veggie, RADISHES. Good thing they grow so quickly. The radishes, not the kids. In a few days, my son will be six.
I love Spring! Happy Living Outside this month.
Friday, March 23, 2012
Black Out Curtains
I work nights at the local hospital, so black out curtains are a must if I sleep between 8am and 3pm. They are also useful if you live by a street lamp, or a neighbor who likes the security of night lights. Here is a simple way to take your exsisting curtains and block out the sun.
First, take down your curtains, measure them and journey to the fabric store for thick, dark fabric. Black is best - I found mine on the clearence rack at WalMart. $1/yard= I bought the whole bolt for $10.
Here is the Before:
Cut and tack or hand sew dark fabric to back side of loops or a high spot on the top of the curtain.
Be sure if you have loops to leave about two inches of fabric to the top. Then, when hanging, the curtain will increase the black out effect. Tack the sides of the curtain down the sides. Since I use these several times a week, I used finishing nails. If used not so much, I suggest thumbtacks.
For a rod that is placed outside the window frame, a top valence is vital. Here, I found four placemats at the thrift store for $1.50. I sewed them together and attached them to the wall above the curtain rod. This way, the light doesn't come out the top.
When the curtains are drawn, keep them closed with horseshoe clips or similair.
The Effect: this room is completely blocked. I had to hide the flash to take this pic. It's 12 noon right now. No light is entering the room.
Happy Sleeping!
First, take down your curtains, measure them and journey to the fabric store for thick, dark fabric. Black is best - I found mine on the clearence rack at WalMart. $1/yard= I bought the whole bolt for $10.
Here is the Before:
Cut and tack or hand sew dark fabric to back side of loops or a high spot on the top of the curtain.
Be sure if you have loops to leave about two inches of fabric to the top. Then, when hanging, the curtain will increase the black out effect. Tack the sides of the curtain down the sides. Since I use these several times a week, I used finishing nails. If used not so much, I suggest thumbtacks.
For a rod that is placed outside the window frame, a top valence is vital. Here, I found four placemats at the thrift store for $1.50. I sewed them together and attached them to the wall above the curtain rod. This way, the light doesn't come out the top.
When the curtains are drawn, keep them closed with horseshoe clips or similair.
The Effect: this room is completely blocked. I had to hide the flash to take this pic. It's 12 noon right now. No light is entering the room.
Happy Sleeping!
Wednesday, March 21, 2012
Making a Dress Form
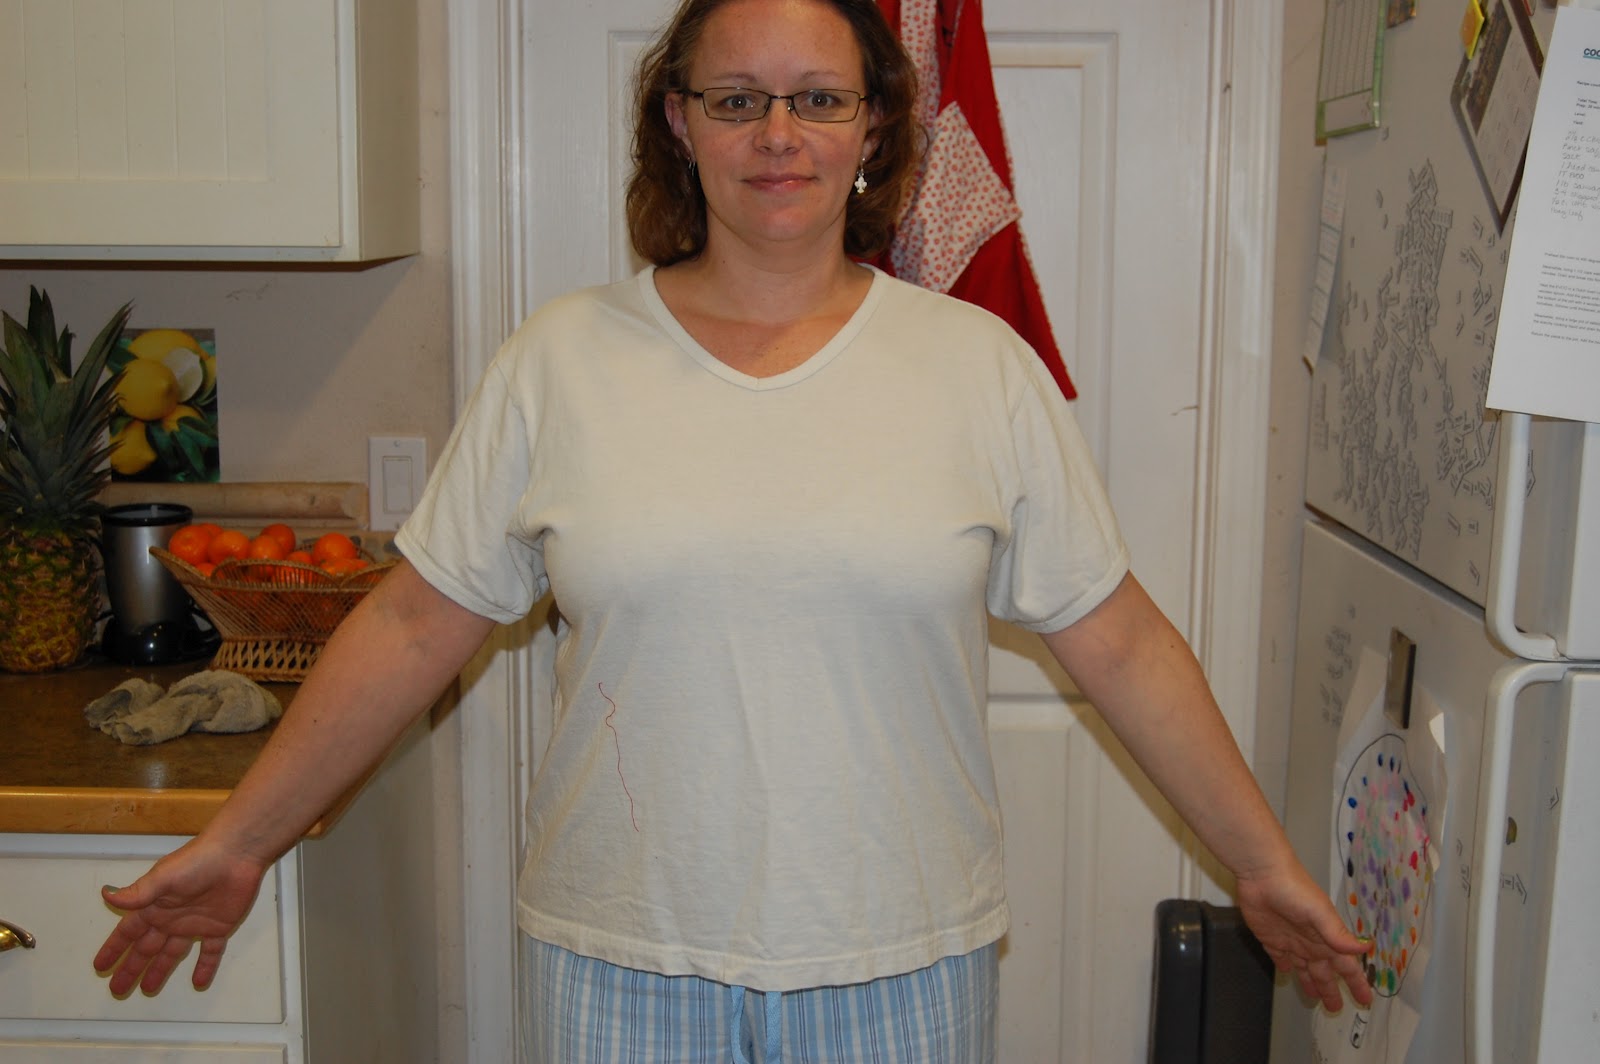
Recently, I had abdominal surgery that, I'm happy to say, has changed my hips and lower abdomen (call it a tummy tuck of sorts). Along with the absence of pain from a C-section scar, I now have a closet full of clothes that also need a nip and a tuck to fit my new shape.
After searching the web for dress forms, I found some in the hundreds of dollars. But I kept seeing hand made forms over and over again. Youtube came in really handy for this. I watched some of the funniest videos, but learned a lot. Duct tape is so useful.
The End Product: ( I lovingly call her, the Other Mother)
Wearing the robe I made for pre-op.
The Process:
Wear a shirt you don't mind losing. Wear comfortable clothes, this took about 2 hours.
Have someone wrap you like Conan the Barbarian, in this case, my daughter texted her friends: "I get to duct tape my mom lol :). Do a thick section around your hips, this is your bottom of your form. A few times under your breasts and in between to keep as true to form as possible.
Ugh, keep going. My daughter made me cover my breasts. She thought it was just gross. Continue with the body and start on the arms.
Finish with the neckline. I wore a V neck shift so I taped onto my skin (not recommended). I had my daughter take a neck piece of folded in half tape (to not be sticky) and wrap it around my neck, then tape up to the piece. If you are claustrophobic, save this step for finishing. When done, cut directly up the back and wiggle out.
Begin stuffing with plastic grocery bags. It takes a lot, I had been saving them for about 6 months and just had enough). Start with the arms, tape the holes once bags are in to help keep form. Continue stuffing to the form, and taping where needed. Once half way stuffed, insert a stick. This stick wasn't my final holder, but it kept the hole open for the final product.
Almost done! I used PVC piping to create the base and stand. Then wrapped tape everywhere. You could paint it too, but I went crazy with the tape. I used decorative butterfly duck tape to cover the rest, pictured is one roll. I need to run to the store for more.
Final Cost:
2 rolls of siver duct tape - $6
2 rolls decor tape- $5
PVC pipe and fittings -$6
Total = $17 - not bad!!!
This had to be the funniest project to date. My daughters and I were laughing, while my 5 year old was taking pictures. Now, a closet full of alterations await. And a bunch on thrift store refashions!
Happy ... tape/wrap/stuffing !!!
After searching the web for dress forms, I found some in the hundreds of dollars. But I kept seeing hand made forms over and over again. Youtube came in really handy for this. I watched some of the funniest videos, but learned a lot. Duct tape is so useful.
The End Product: ( I lovingly call her, the Other Mother)
Wearing the robe I made for pre-op.
The Process:
Wear a shirt you don't mind losing. Wear comfortable clothes, this took about 2 hours.
Have someone wrap you like Conan the Barbarian, in this case, my daughter texted her friends: "I get to duct tape my mom lol :). Do a thick section around your hips, this is your bottom of your form. A few times under your breasts and in between to keep as true to form as possible.
Ugh, keep going. My daughter made me cover my breasts. She thought it was just gross. Continue with the body and start on the arms.
Finish with the neckline. I wore a V neck shift so I taped onto my skin (not recommended). I had my daughter take a neck piece of folded in half tape (to not be sticky) and wrap it around my neck, then tape up to the piece. If you are claustrophobic, save this step for finishing. When done, cut directly up the back and wiggle out.
Begin stuffing with plastic grocery bags. It takes a lot, I had been saving them for about 6 months and just had enough). Start with the arms, tape the holes once bags are in to help keep form. Continue stuffing to the form, and taping where needed. Once half way stuffed, insert a stick. This stick wasn't my final holder, but it kept the hole open for the final product.
Almost done! I used PVC piping to create the base and stand. Then wrapped tape everywhere. You could paint it too, but I went crazy with the tape. I used decorative butterfly duck tape to cover the rest, pictured is one roll. I need to run to the store for more.
Final Cost:
2 rolls of siver duct tape - $6
2 rolls decor tape- $5
PVC pipe and fittings -$6
Total = $17 - not bad!!!
This had to be the funniest project to date. My daughters and I were laughing, while my 5 year old was taking pictures. Now, a closet full of alterations await. And a bunch on thrift store refashions!
Happy ... tape/wrap/stuffing !!!
Men's Shirt Refashion to Child's Robe
I love thrift shopping. It's hard to go to a clothing store and pay full price for something when I know I could find something similar for cheap. I recently saw a site www.refashionco-op.blogspot.com It is a group of people who take thrift store finds and do unbelievable things. I wanted to try my hand with this little thing.
The Before:
An extra large fuzzy men's shirt from the 80's with a short zipper at the collar. First thing, I used a seam ripper to remove the zipper. Since the shirt was $2.99, I can't do much to loose my money. Next, I used a robe pattern from a child's pajama set. I didn't like to way the pattern was set up, so I improvised. I cut the large pieces first then used the smaller pieces that I needed to jigsaw to get the perfect fit.
The After:
The edges on the robe are parts from an Ikea blanket ($3/flannel).
I had my son try it on, and he didn't take it off. He took a bath, put it on, and then slept in it. I think he likes his new robe.
Happy Re-fashioning!
The Before:
An extra large fuzzy men's shirt from the 80's with a short zipper at the collar. First thing, I used a seam ripper to remove the zipper. Since the shirt was $2.99, I can't do much to loose my money. Next, I used a robe pattern from a child's pajama set. I didn't like to way the pattern was set up, so I improvised. I cut the large pieces first then used the smaller pieces that I needed to jigsaw to get the perfect fit.
The After:
The edges on the robe are parts from an Ikea blanket ($3/flannel).
I had my son try it on, and he didn't take it off. He took a bath, put it on, and then slept in it. I think he likes his new robe.
Happy Re-fashioning!
Thursday, March 15, 2012
Project Studio - Arrival
The sheds are here. They fit nicely into a two car garage. Unfortunately, they will have to sit there for a while. I had surgery recently and California is finally getting some good rain. My kids are excited to start. I, on the other hand, can wait a while. Abdominal surgery can leave you worn out.
Wednesday, February 29, 2012
Prepare for the Summer Garden
In California, it's looking a lot like the end of Spring. But, as my calender schedule tells me, it's about the time to start the seed pots for this summers bounty. As always, I dig my nose into the latest seed catalogs, stand like a kid in a candy store in front of the seed display at the local store and plan for a giant garden. In reality, I have several raised beds that are stuffed to the brim with growing goodies.
This years plan is seen above....too much?? Well, after this photo was taken, I put in an order for more seeds. Is there such thing as a seed-aholic? Come to find out, my mother was out of something that I just so happen to have. So I am planning on starting seedlings and giving her a ready to plant heirloom tomato. I also start seedlings and bring them into work. It is always fun when people bring in veggies to share in the summer.
Where to put the seeds? I am also an organization junkie, so I have a place for everything.
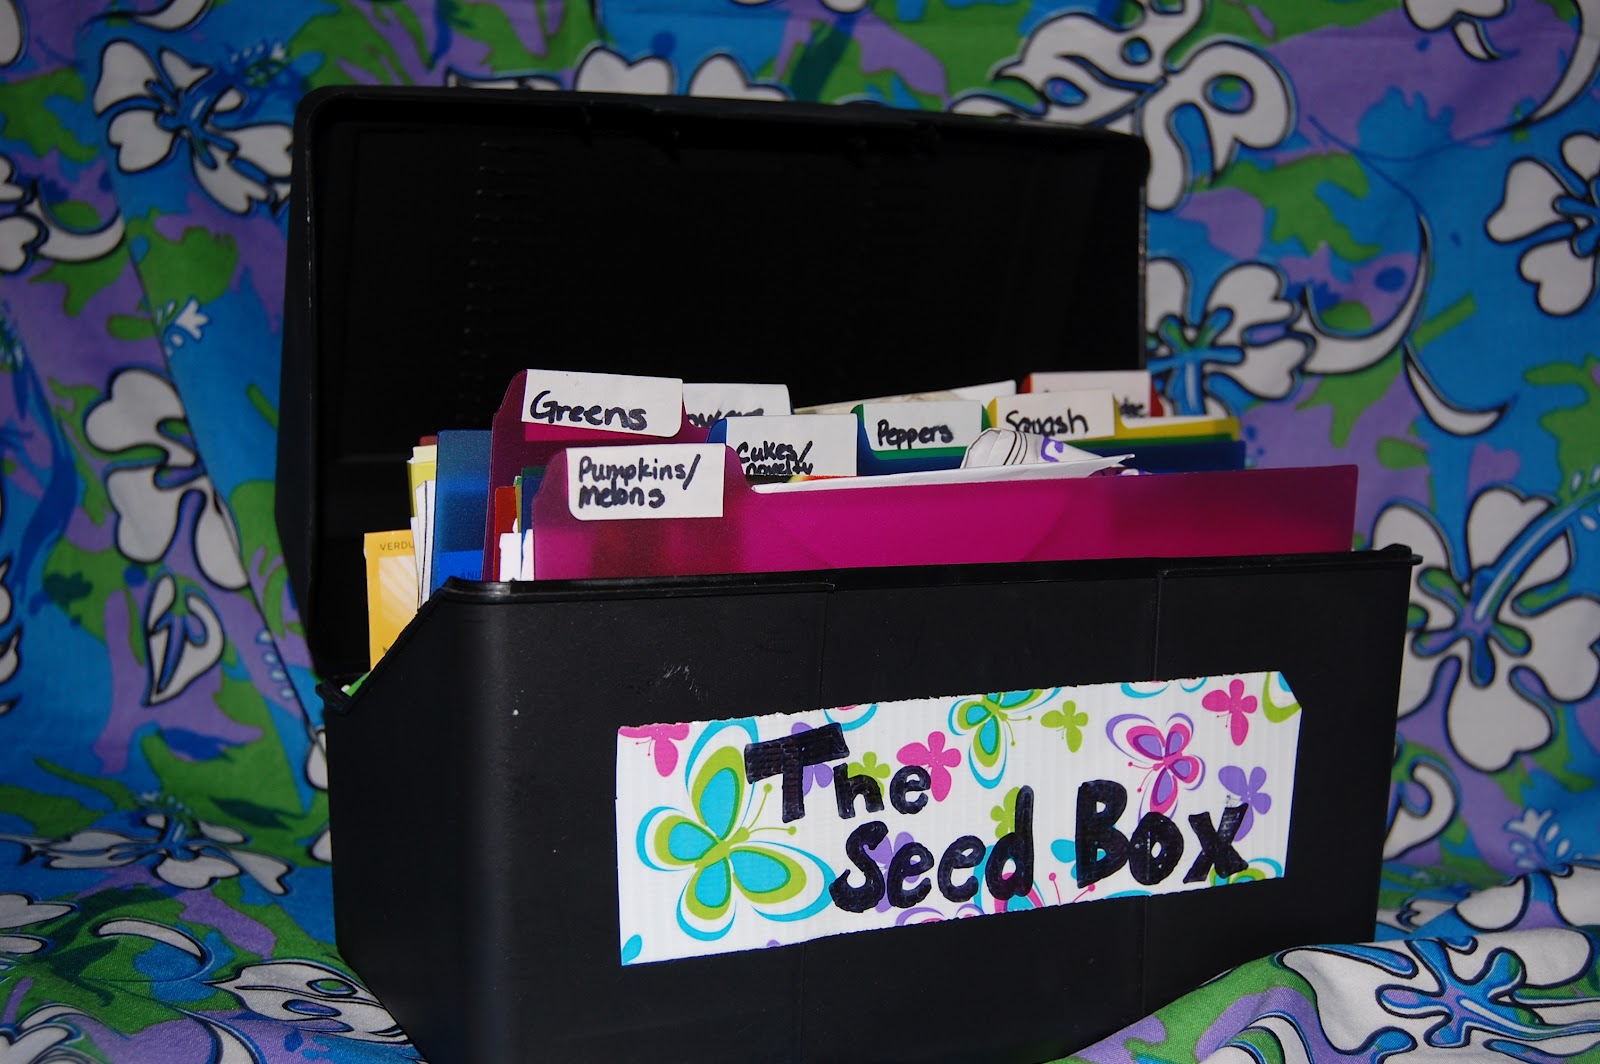
The Seed Box is a simple index card box(large sized) with dividers. Seed packets fit right in to their designated area.
Next up, making seed pots from newspaper. I have this great little gadget from Burpee Seeds, called the Potmaker. A wooden contraption that rolls lengths of newspaper into pots that grow seedlings that can be planted straight into the ground. Very clever.I have accomplished the same process by rolling a length of newspaper (10"x4") around something round (eg. thick dowel, small can like tomato paste) and folding the bottom edge to hold together. I have put tape on the bottoms before, but had to remove the paper before planting.
New items I have chosen this year are small golden squash that look like pears, luffa sponges, Cinderella pumpkins, and heirloom veggies that I plan to seed save to use for years to come. By the way, saving seeds is easy and free. Just don't save hybrid seeds. They might grow again, but not the same as first year.
Happy Seeding!
This years plan is seen above....too much?? Well, after this photo was taken, I put in an order for more seeds. Is there such thing as a seed-aholic? Come to find out, my mother was out of something that I just so happen to have. So I am planning on starting seedlings and giving her a ready to plant heirloom tomato. I also start seedlings and bring them into work. It is always fun when people bring in veggies to share in the summer.
Where to put the seeds? I am also an organization junkie, so I have a place for everything.
The Seed Box is a simple index card box(large sized) with dividers. Seed packets fit right in to their designated area.
Next up, making seed pots from newspaper. I have this great little gadget from Burpee Seeds, called the Potmaker. A wooden contraption that rolls lengths of newspaper into pots that grow seedlings that can be planted straight into the ground. Very clever.I have accomplished the same process by rolling a length of newspaper (10"x4") around something round (eg. thick dowel, small can like tomato paste) and folding the bottom edge to hold together. I have put tape on the bottoms before, but had to remove the paper before planting.
New items I have chosen this year are small golden squash that look like pears, luffa sponges, Cinderella pumpkins, and heirloom veggies that I plan to seed save to use for years to come. By the way, saving seeds is easy and free. Just don't save hybrid seeds. They might grow again, but not the same as first year.
Happy Seeding!
Subscribe to:
Posts (Atom)