I hope everyone had a Merry Christmas. Now that the holiday is over, I can post my gifts I made this year. It was the year of the apron. Each one of my family got one that matched their style.
The tutorial below is the Working Apron. Made with hooks, so that the wearer can turn the bottom portion into a basket. Perfect for my mom who can collect eggs, take clippings to the compost pile, bring ingredients from her pantry to her kitchen, and on and on. Thanks Abby for modelling.
The pattern is busy, but there are two pockets on each side. Plus, it's reversible.
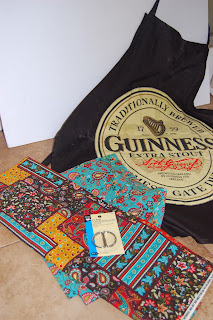
First thing you need, is an apron you like the fit to. If you don't have one, draw out a pattern onto the fabric you are using. Note: My favorite apron from the Guinness Brewery in Dublin, Ireland.
Need:
1 yard each of coordinating fabrics
2 hook/latch notions
1 "D" ring
Measurements:
26" across at hips, 36" long from middle of bib, 14" wide at bib
2 1/2 " x 32" for neck tie and waist ties ( need three altogether)
9" x 7" for pockets ( need four if doing reversible, two in one-sided)
1. Cut out all your pieces. Fold over tops of pockets about 1" and press and stitch. Press 1/2" on remaining edges and pin to apron where you want pockets. Sew on.
2. Sew waist and neck ties with right sides together on three sides (leaving small edge open to turn). Turn out and press. Top stitch if desired.
3. Lay right sides together of main apron pieces. Pin waist ties at sides, with the unstitched side of tie flush with raw edges of apron. Make sure your ties are facing inside your apron when you sew.
4. For the neck tie. Cut the tie four inches at one end. This will be your D ring holder. Place the D ring on the tie and fold over. Sew 1/2" below ring to secure it in place. Then, pin to the inside of the right side of the bib area. Again, make sure it lays inside your apron. (Man, I wish I had taken a picture of this!)
4. Now you should have a basic form of an apron, with little areas showing where the ties are. Sew sides and top together. AGAIN, make sure you don't sew your ties on accident. (Are you wondering why I mention this so much....Been there, did that!)
5. Turn apron right sides out and you have an apron. Press all edges. At the bottom, turn in 1/2" and press. Top stitch everything.
6. Last step is to apply the hooks that make the "basket". I found the easiest way to do this is to wear the apron and pull the bottom up. This makes a perfect fit for you. I hand stitched these and found decorative hook and latches at Walmart that looked great with the style of fabric.
Once complete, here is what it looks like when the "basket" is in use on the reverse side of apron.
Happy Sewing!


You are so creative and seem like a great mom!!!!
ReplyDeleteI love your blog!!!